Why Cantex ?

Why Cantex ?

Their material is UV-stabilized for weathering strength in the changing climate of Northern Ohio. It also machines and drills consistently. The dielectric constant is the same from piece to piece, and the Cantex compound resists chalking. I've filled a dumpster with look-alike parts that failed to survive the coiling process at some point.

See http://www.cantexinc.com for specifications.

The information presented here is accurate and true to the best of the author's knowledge. All recommendations and statements are made without guarantee on the part of the author. The author disclaims any liability in connection with the use of this information.

Thursday, October 8, 2015

A New Approach to Winding Aluminum Wire October 8th, 2015, rejected October 11, 2015

The tried-and-tested techniques used with stainless steel wire do not work with 5356 aluminum 1/16" wire.


The wire kinks and changes position on the coil form after it exits the guiding tool. Any small amount of slack is immediately translated into random wire movement. Back to the drawing board.
We'll start by eliminating the wire bending tool on the feeder stand. Tension on the wire is set by the spring-loaded brake in the wire spool spindle. So far so good. However, the black ABS glue pads that worked well for stainless steel have no effect on the soft aluminum. Time for a new approach.
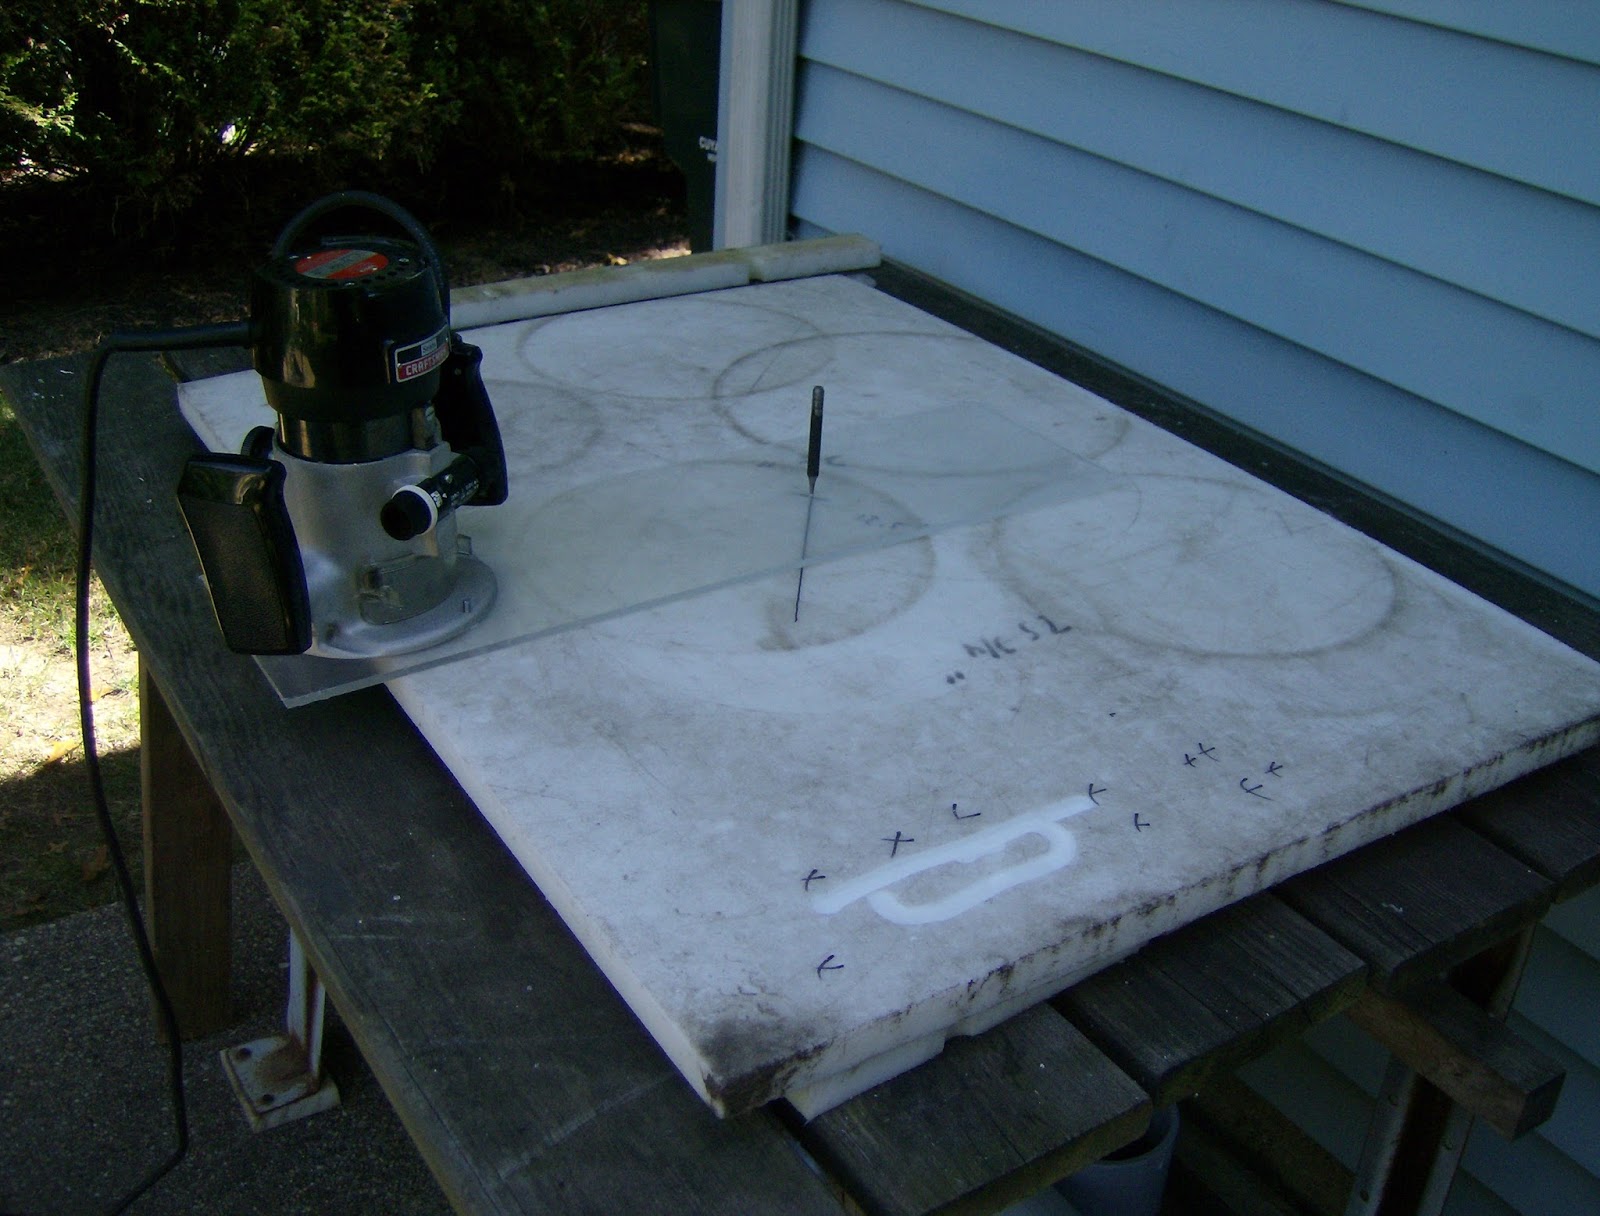
 Here is a test piece with an end-to-end chalk line. This line is the guide for a new tool, the router.
Before routing, we need a tool guide to keep the router from wandering on the tube. Cantex makes a coupler, p/n 6141632, that's just right for riding the tube surface. Here the coupler is cut in half and the inside stop is ground off. The shell is fastened to the router base plate, and we're ready for action.


The router is set up with a 1/2 inch straight bit, and is set for a 7/64 inch deep cut. The theory is that the hard edges made by the router channel will slightly deform the aluminum and hold the coils in place.

The rice-like crumbs from the process fly everywhere ! Keep that ShopVac handy.


Four cuts are made on the tube, each at 90 degree intervals. Next, we roll !


Sunday, 10/11/15; The tensile strength of the wire is such that the grooves proved worthless.
On to plan C.


Sunday, September 20, 2015

Setting up the new 24 inch sheave...Slower surface travel speed and increased torque will yield high-quality coils with uniform spacing between the turns.

The tried-and-true drive assembly is placed in the worktable base.


The support rack idler wheels are centered over the drive pulley and pulled away from the table edge to accommodate the new sheave and flange unit.


The new head stock resting in place and waiting for a new 72" drive belt. C-clamps, a rubber mallet, and shim stock make the project gel in minutes.

Remember to clean thoroughly the bell end of the new tube section. Dirt and other corruption make the joint between the tube and the flange connector difficult to assemble and take apart. One go-around with a 10' section of tube and you'll realize immediately why 4 inch is as large as it gets for this project. 


Weight with hardware is 22.2 lbs., and the new travel speed on the 4" work piece surface is 171 inches per minute.

The new travel speed is ideal for 1/16" 5356 aluminum wire. Removing one of the shims, shown stacked to the right of the pulley, allows the operator to rotate the sheave by hand during set up.


Before winding, we'll put on four adhesive strips. Here is the "before" shot.


And here is the "after" result, with the blue painter's tape removed.


Saturday, August 22, 2015

General information, September 2015


The tube section shown above displays the first of four pinstripes made of black ABS glue, each at a 90 degree interval. The edges of the stripes hold the coil wire even on hot, sunny days. When the pipe is free-standing, it will bend slightly in the wind. The wire will move a finite distance on the coil form! The black adhesive will keep the wire secure.


Be sure to have lots of ventilation if you use this stuff !! Most hardware stores
sell Oatey ABS cement in several flavors. Be sure to get the black version.

The data sheet from Oatey is recommended reading;


Blue painter's tape defines the black channel. Allow the cement to harden for a day before winding wire on the form.


PVC electrical conduit is inexpensive and available everywhere. It's ideal for Tesla coil projects and RF coil forms.

A 10' piece of Cantex 4 inch schedule 40 electrical conduit, part number A52EA12, ready for coiling, is shown below. A plastic scouring pad and windshield washer fluid are used to clean the section prior to winding.

Electrical conduit is designed for above-ground and below ground service, and is stable over a wide temperature range. The Cantex formulation is consistent from lot to lot. The tube does not exhibit "chalking", or surface weathering.


References;


PVC Pipe Association;  http://uni-bell.org/
All kinds of useful data here.


Here are two sites that outline the dielectric properties of different plastics, including PVC.


Cantex pipe data sources;


A thoroughly developed web site; easy to navigate and packed with information.


A copy of the Cantex catalog; http://www.cantexinc.com/resources/product-catalog

My local source for all things Cantex. The company has several stocking facilities in northeast Ohio.  Call 800 288 6277  for more information.


Here is an all-band vertical dipole antenna for my ham station. The stand is a discarded safety sign base, and brings new meaning to the term "portable". The wire is 309 stainless steel, .045" diameter.


Above, a re-wound single wind on the same 4" coil form as was used for the dipole.
The wire spacing is determined by the tool shown below.


Several readers have asked for more specifics on the winding guide. The tool shown above is a 3" piece of 1/4" Teflon(R) PTFE tubing with a 1/16" inside diameter. I buy this from McMaster-Carr in Ohio. The part number is 8547K22. It's sold by the foot and is not very expensive.

Two sets of cuts are made on the tubing with a razor blade. The first set is made for the tubing to conform to the coil form as it rotates under the operator's  hand.

I use 2 cuts, each at 30 degrees with respect to the tool end, on opposite sides of the tool. Configured this way, the tool rests on the coil form surface without twisting or turning.

The second set of cuts is made on the right and left sides of the tool. These determine the distance between the wire on the coil form and the wire exiting the tool, in other words, the coil spacing.

As shown above, I'm experimenting with a 1.5 times wire diameter spacing for a trade off between the amount of wire on the form and the capacitance between the turns. 
http://www.w8ji.com/loading_inductors.htm presents some interesting data on the subject.
http://www.g3ynh.info/zdocs/magnetics/appendix/self_res/gallery.html has a fascinating article on coil phenomena.
http://www.crystalradio.net/professorcoyle/professorcoylecyl.shtml has a calculator that every Coil Builder will find useful.

 As to the type and size of wire shown on theses pages, the best wire is the wire you can get your hands on at the right price.

Adhesive tape is wound on the Teflon(R) tool as a grip pad for the operator. Five or six layers of tape should be sufficient for the operator to hold the tool between the thumb and index finger of one hand without interfering with the winding process.
The Teflon(R) tool material has a very low wear rate. I've used the one you see on six 10' coils and have yet to see any appreciable wear.


Sunday, December 16, 2012


Let's get into production. Always wear loose-fitting gloves and safety glasses.
The motor start switch is mounted just to the left of the wire spool. As the wire is wound on to the tube, the operator moves the wire transport with his/her feet.


Tuesday, December 11, 2012

Here is the prime mover for driving the headstock.  The wood pillars are not fixed in position; other pulley combinations can be plugged in to give different shaft speeds. Ideally the surface speed on the 4" shaft will be between 175 and 200 inches per minute.


  The two small blocks on the bottom allow space for the operator's fingers. Portability and flexibility are key to the construction process.
 
The small 1 1/2" pulley is fastened to the major 10" pulley with J-B Weld. Scrapped clothes washers and dryers are good sources for pulleys and drive belts of all sizes. In my experience, Maytag and Westinghouse are the brand names to look for.

  The motor is a Westinghouse single phase 115 volt workhorse with a 25' cable for the remote on/off switch.


Another view of the motor/pulley fixture. The hardwood cross members support and align the 3/8" bolt shaft. Industrial-grade pillow blocks are not in the budget.

 The fixture sits on the lower shelf of the utility table and is shimmed in position. The primary and secondary drive belts are from junked washing machines.


Next, we need a way to get wire to the turning tube. The base is again scrap plastic .707" Nylon. The floating casters, like everything else you see used in this project, are from a junk yard. The plastic carton is a seat for the operator, and is equipped with a cushion. The pedestal holding up the spool of wire is from a discarded MIG welder, as is the wire spool adapter support.


The wire transport must move with the operator as the coil is formed. When you're setting up to wind a coil, be sure to find a smooth flat surface for the transport. Bumps and stops are annoying, and show up in the finished product.

At this point, we address the wire itself. Cut off a piece of wire three turns around the spool and place on the ground. The diameter of the loop is called the cast of the wire. The surplus material I have has a twenty two inch cast and a very high tensile strength. Another way of saying it is very tough to work with. To make the wire more amenable, a wire straightened is modified to be be used as a wire bender or preformer. The new cast will form a circle very close to the conduit diameter, approximately 4 1/4".
The torque supplied by the over-sized head stock is enough to pull the wire through the bender to the tube form.


Inches per Pound of Wire


        Wire
    Diameter
                                                                  Silicon                                                Stainless
                                      Aluminum           Bronze         Copper       Nickel          Steel

.020 "                               32,400               10,300             9800          9950            10950
.025 "                               22,300                7100               6750          6820             7550
.030 "                               14,420                4600               4360          4400             4880 
.035 "                               10,600                3380               3200          3240             3590
.040 "                                 8120                 2580               2450          2480             2750
.045 "   3/64 "                    6410                 2040               1940          1960             2170
.062 "   1/16 "                    3382                 1070               1020          1030             1140
.078 "   5/64 "                    2120                  675                 640             647              718
.093 "   3/32 "                    1510                  510                 455             460              510
.125 "    1/8 "                      825                   263                 249             252              279
.156 "   5/32 "                     530                   169                 160             162              179
.178 "   3/16 "                     377                   120                 114             115              127
.250 "    1/4 "                      206                    66                   62               63                70
----------------------------------------------------------------------------------------------------------


Revised Headstock Design September 18, 2015


 Cutting the new sheave from a large square. Six passes with router were needed to make a complete cut on
one inch material. Below, an acrylic panel fastened to the bottom of the router acts as a circular guide around the center pin.


The original 16 inch flange/sheave is shown resting on the new sheave material. Why the bigger pulley ?

Slower travel speed and increased torque for large diameter wires are pluses. .052", .062" (1/16) and 3/32" wires are more easily wound at slower speed. Operator control is the name of the game.


The head stock design will determine your surface winding speed and torque for wire forming.
 The white plastic base is 1 inch thick HDPE sheet cut from a scrap square and bolted to a 4" schedule 80 flange. A router used for woodworking is indispensable for this work. Setup is simple. The machine does it's job flawlessly, but keep a supply of garbage bags on hand. You will empty your ShopVac reservoir several times as your work progresses. 


Before final assembly with the mounting hardware, a router is used to create the groove for the drive belt. My thanks to redneckdiy.com for instructions on this method. The sheave is now ready for action.


The stub in the flange is schedule 80 stock. Standard PVC cement holds it in place. This is the interface between the fixture and the work piece.


The finished sheave has a inside diameter of 23 inches. Weight with hardware is 22.2 pounds. 


Note the small grey bracket to the right of the flange. This supports my Digital Turns Counter; a pedometer compliments of the local health & wellness expo.


Saturday, November 24, 2012


This support bracket must hold the weight of the head stock, tube section and wire. It is held in place
on one side by a large C clamp. The other side floats, and is shimmed for proper belt tension after
the work piece is loaded.

                                     
                                          Two small casters support the work piece.